This page serves as a guide on how to test a conda package for publication to bioconda and also how to publish it on the bioconda repository. To follow through this guide, we will be using x-spear as a reference.
Testing Locally
First create an Anaconda environment of your choice in the Cheng Lab virtual environment directory:
conda create -p /project/hipaa_ycheng11lab/software/virtual_environments/<venv_name> python=3.11`
conda install -p <path_to_venv> conda-build git conda-verify
git clone the repository into a location on the cluster
First put any Zenodo configs, small datasets (<=100MB), or pickle files into src/<package>/data. For any reproducible data from zenodo use the wget command:
wget https://zenodo.org/records/.... -O <filename>
Why is this important?
-
We need to do this because the .gitignore file ignores large files that cannot be put onto the Git repository directly and its needed for code to work in xspear local builds.
-
Change the version in
setup.pyandmeta.yamlin the package github files by bumping it up one version as well. e.g.0.0.3 → 0.0.4.- Once satisfied with the package development, ensure that your changes are pushed (this should be mainly the python files) to main branch. You can check this after adding and committing files before pushing by using the
git statuscommand, then push!
- Once satisfied with the package development, ensure that your changes are pushed (this should be mainly the python files) to main branch. You can check this after adding and committing files before pushing by using the
# in interactive session
# run uninstall only if you have a previous xspear
conda uninstall -y xspear

cd </path/to/your/package/clone>

module load anaconda/3
conda activate /project/hipaa_ycheng11lab/software/virtual_environments/xenium_probe_pipeline
conda uninstall -y xspear
conda build purge
conda build . -c conda-forge -c bioconda --no-test
conda install xspear --use-local
the path to local xspear build is given in the standard console output listed below which will be used in the next step. When you run conda build . earlier, this will be a paragraph that is the output.
# To have conda build upload to anaconda.org automatically, use
# conda config --set anaconda_upload yes
# with the changes to conda, doesn't look like the anaconda upload is working, just find the .bz2 file and continue below.
anaconda upload \
    /home/<user>/conda-bld/noarch/xspear-0.0.x-py_x.tar.bz2 # this path, copy and paste!
anaconda_upload is not set.  Not uploading wheels: []
- Run
conda install -y <path_to_local_xspear_tar.bz2 file>using thetar.bz2path given above by theconda build .output- OR just use the –use-local flag
git pullto make sure your local repository is up to date with github’s remote. Then,git add,commit, andpushyour changes tomain- Once done, navigate to your repository page and click create a new release on the right hand side of the repository (this should be after you see your new changes committed to main branch)
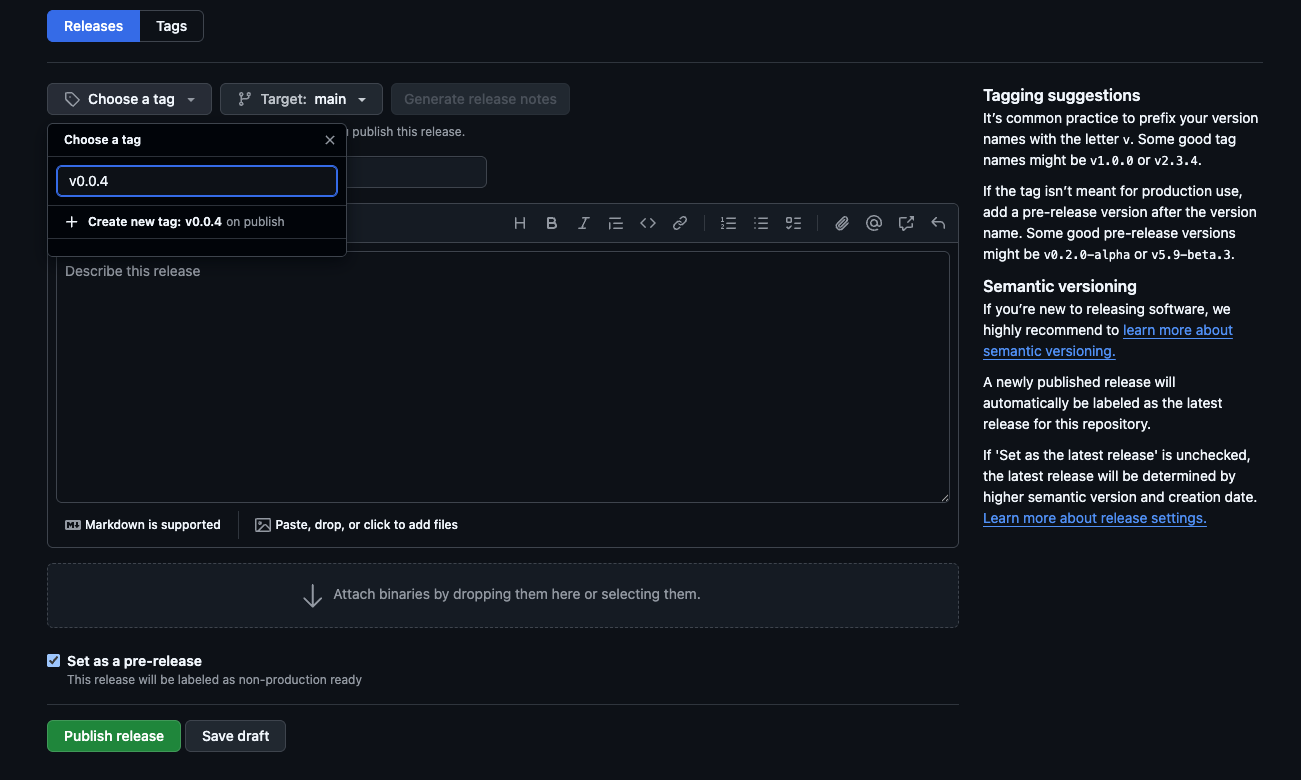
- Set up the new release as shown below, creating a new tag for the most recent version you want to publish and create a new tag. Checkmark
Set as a pre-releaseif this is a package before publication of the paper and include a short summary. ClickPublish releaseand you should be able to see it as the most recent release.
NOTE: the release format only works in the format described in the screenshot below aka vX.Y.Z. Make sure to put v (lowercase) in front of the tag version!
 !
!
Publishing Package with Versioning
Now that we have created a published release in our coding repository for our package, we need to make sure bioconda has the right version of our package to publish.
Forking the bioconda repository
- Navigate to the bioconda-recipes repo and create a fork on the top right of the main repository page.
- When prompted to choose an owner, click your user account.
- You can then clone your forked version of the repository using
git cloneto clone this to your local machine (off cluster)
- In
bioconda-recipes, if it exists already (e.g.recipes/xspear), navigate to themeta.yamlfile inside your package subdirectory. Otherwise, make a new directory inrecipessubdirectory of the repo. - For convenience, a different, fully-published package named ervmancer and its
meta.yamlfile is provided to you as a reference linked here.
Extracting the hash to publish on bioconda and editing yaml
We need to update the sha256 hash of the newest version of our project because the existing sha256 of our current meta.yaml on the bioconda-recipes repository is one of our previous published package versions.
Use the following command for your repository. So for xspear, the command would be as follows:
- Make sure you are in your cloned bioconda repository again
- Run the following command to make sure the fork is up to date with the main repository using
git pull upstream master. - create a branch to commit and push changes to:
git checkout -b <package_name_changes_vX.Y.Z>. If done right you should correctly see the current branch name you just made in parentheses in your console. wget -O- https://github.com/yuyanchenglab/prj2601_x-spear/archive/refs/tags/v<version>.tar.gz | shasum -a 256- The output shasum is what you will replace the shasum in your yaml file with.
- Make sure to also bump the version under
{% set version = "0.0.x" %}in your yaml file. - Commit and push this to your branch of the fork cloned local repository.
Opening a Pull Request
Now that we made our changes on the fork of bioconda-recipes, we are ready to create a pull request by navigating to Github UI on your browser.
- Go to your forked version of bioconda and navigate to the pull request tab - this should be under your username. For mine it is: https://github.com/bryantduong/bioconda-recipes/pulls.
- Then create a new pull request with the branch that you made on the head repository section, like below. It should have
<git_username>/bioconda-recipesunder head repository and the base as the actualbioconda-recipesrepo to merge.
Since I have not made any changes, there are no comparisons. and fill out the information with the subject in the comments as Bumping version of <package> to vX.Y.Z with the subject Updating <package> to vX.Y.Z. An example of a previous PR approved by bioconda is given here.
Once you create the PR, you can add additional changes to pass the linting and other checks they have set in place in their pipelines. you can also keep adding any functional changes to your package source code and publish a new release and create a new hash in case you forgot any new hashes. The bioconda team will NOT review your package push until you tag BiocondaBot by writing the comment explicitly as: @BiocondaBot please add label. If you need any assistance with formatting or are lost, please look at the example PR for ervmancer linked above.
Viewing the package live on the bioconda channel
Once accepted and pushed to master by the Bioconda team, it may take up to ~30 mins - 1 hr to show on bioconda and be installable. Congrats! You are now officially done with pushing your package changes to bioconda for users to install!